More PHP Testing
We though we would write another article this time discussing testing PHP scripts using PHPUnit in an attempt to produce quality test units from our test cases.
During development we write PHPUnit test cases for each class we implement this allows us to build a collection of tests which we can run if we make any changes to our code base.
This allows us to verify that any changes we have made to a part of the system does not affect it as a whole.
 |
| Software Testing |
Installing PHPUnit
It is simple to install PHPUnit and there are a couple of ways you can go about it we use the pear packages provided for our installation. Run the following commands as root to start the installation process.
root@chic:~# pear channel-discover pear.phpunit.de &&\
pear install phpunit/PHPUnit
This will install PHPUnit on you system by adding the correct channel and running pear install. Pear is a great tool for packaging up PHP scripts but its beyond the scope of this article.
We also need to consider any dependencies which we need to install for some added functionality such as code coverage reports.
root@chic:~# pear config-set auto_discover 1 &&\
pear install phpunit/DbUnit &&\
pear install phpunit/PHP_Invoker &&\
pear install phpunit/PHPUnit_Selenium
Next we need to install xDebug which is a very useful and feature rich program which can be used for debugging purposes or profiling a script and much more.
root@chic:~# pecl install xdebug
Once this has installed we need to make the module load by adding a file to the conf.d directory under the PHP configuration directory.
/etc/php5/conf.d/
And add the following line to the new extension file like below by using a conf.d file allows changes to the main configuration to not affect xDebug,
zend_extension="/usr/local/php/modules/xdebug.so"
Now we are ready to start writing our test cases to build a test suit for any software we have developed.
 |
| PHPUnit |
Writing Test Cases
When we write classes or add some additional functionality to existing code we make sure that we write a comprehensive test case which tries to test all available code paths.
During development of our news system we have been writing test cases after we complete each class that implements our functionality.
We follow a kind of test driven agile development but we like to implement our test cases after we have written the class to be tested not the other way around. This is a slight variation on test driven development and one that suites us.
Our test case uses the usual naming convention for class names such as NewsFunctionTests would be the test case for the NewsFunction class this is used for all classes.
Test case files are located under the tests directory which is a sub directory of the location of the class file which is being tested.
When writing a test case our test class extends the PHPUnit_Framework_TestCase as you may have noticed phpunit makes good use of class name spaces so we should have no class name collisions.
Naming of our test methods follow the standard convention (although this can be configured via comment tags) of prefixing all tests with the string test so if it was to test a method called newsMethod() it would be called testNewsMethod().
PHPUnit will run any methods with a test prefix as a test and the results of those tests will be displayed to the user via the command line.
class NewsTest extends PHPUnit_Framework_TestCase {

  public function testNewsMethod () {

    $this->assertTrue(true);

  }

}
The documentation for PHPUnit has a whole section for explaining available assertions which are the basis of your tests this allows a developer to test a response is correct and as expected. Please see here for documentation on assertions.
We have found the PHPUnit documentation a good reference point for when we are writing tests and it is a very useful and comprehensive website.
 |
| Test Case Class |
Using PHPUnit
For running tests we use the phpunit command line program we have organised our test cases using a directory structure we also write a config file for each test suite the config file is named phpunit.xml and when you run phpunit via the command line it will check the working directory for this file.
We create a config file for each suite of tests so our first task before running our tests was to edit the xml configuration file.
vi /web/root/tests/phpunit.xml
We add our config
<?xml version="1.0" encoding="utf-8" ?>

<phpunit>

  <testsuites>
<testsuite name="example_tests">
<file>TestCaseOne.php</file>
<file>TestCaseTwo.php</file>
</testsuite>
  </testsuites>

</phpunit>
After this we run our test suite using the command line application we have added some switches to control how the program is run. We generate a code coverage report when running our test suites as well as some agile documentation.
root@chic:~# phpunit --coverage-html /report/output/dir/ \
--testdox-html /report/output/dir/ \
--bootstrap /path/to/bootstrap.php
You may notice the bootstrap flag which allows us to execute the contents of the bootstrap file before testing starts. We use this to load our database abstraction layer and set some configuration data.
Once the program finishes running the tests will have been executed and the results of those tests will be displayed to the command line. It shows how many tests have been run and the number of assertions.
Any failures will be displayed to the command line along with some useful debug information to tell you what has gone wrong and what was expected and what was encountered.
 |
| PHPUnit Command Line |
Code Coverage Reports
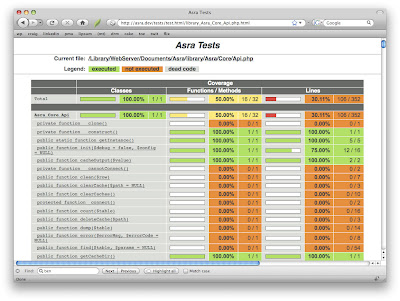
We generate HTML code coverage reports while running our unit tests so we can see which lines of code our tests cover and which lines it does not.
This allows you to know you are testing every last line of your classes we upload our code coverage reports using scp to docs.chic.uk.net which is our digest protected documentation site.
By studying the code coverage reports we can check any missing tests and make sure we are testing our whole code base and where to focus our testing efforts.
 |
| Code Coverage |
Conclusion
Writing test suites to provide regression testing allows a developer to have confidence that their changes do not have wider implications on the system as a whole. We have found a combination of PHPUnit and xDebug provides us with a powerful testing platform.
Again this article show how we have taken advantage of an open source stack to provide a platform from which we can test our software.
In the coming weeks we will be writing an article regarding using xDebug for profiling scripts and using Kcachegrind to interpret the results from these tests.
Profiling allows a developer to focus his attentions on certain parts of code which may allow better optimisation in turn improving performance.
Finally a little note about our new feature to provide local amenity information we now have over 38000 local businesses in our database and listed on our listings pages and it is still growing.
This is a great resource for our visitors and we are happy with its progress so far please take a moment to visit one of our enhanced listings on The Care Homes Directory.
Appendix
PHPUnit logo: http://clivemind.com/wp-content/uploads/2012/07/logo.png
xDebug screen shot: http://webmozarts.com/wp-content/uploads/2009/04/xdebug_trace.png
Test class image: http://www.php-maven.org/branches/2.0-SNAPSHOT/images/tut/eclipse/phpunit_testcase.jpg


